Showing posts with label Stencils. Show all posts

Monday, September 16, 2019

T Stands For Stencil Smooshing Technique!

"Whoever exalts himself will be humbled, and whoever humbles himself will be exalted"  Matthew 23:12 Memory Verse for Week 4 of Revive Our Hearts Esther Bible study.

Today, I have been playing with an acrylic paint technique and an  oxide inks technique.  I will show you the one with the oxide inks.  This was done for our Try a New Technique Challenge on SplitcoastStampers today.  They directed us to this tutorial,  which I watched while doing this.


I applied gesso to my cardstock first.   Then I applied the oxide ink direct from the pad to the stencil.
I did this with four different ink colors and three different stencils.  After I applied  the ink to the stencil, I  spritzed it  with water a couple of times.  Then I laid the stencil down on the paper.    I did each stencil and even on top of the other, but I dried in between; I just dabbed with a paper towel.


Then I cut the paper down to the size  I wanted.  I chose where I liked the design best.  I will have leftovers for another card.  

My finished card:  I  added the piece to a turquoise base and added a thank you die cut. I want to play with this some more! 


For Elizabeth's T Stands For Tuesday over at Altered Book Lover, I have these photos for you.  I have been wanting to walk around this pond at a local shopping center.  A friend and I had lunch there, and then walked around the pond.  She took the photos for me. :)


 There is an island in the middle of the pond, and that is where the waterfall and little bridge are.
There were heron, too, but she didn't get a photo of them.  However there is something on top of the bridge.

And here I am with my water from lunch. :)

Have a wonderful week!  I am having fun in my craft room, hope you are doing some fun things, too.
Thanks for stopping by. 

Friday, May 17, 2019

Let's Party Over At TIOT!

Ps. 119:11 "Thy word have I hid in mine heart that I might not sin against thee."

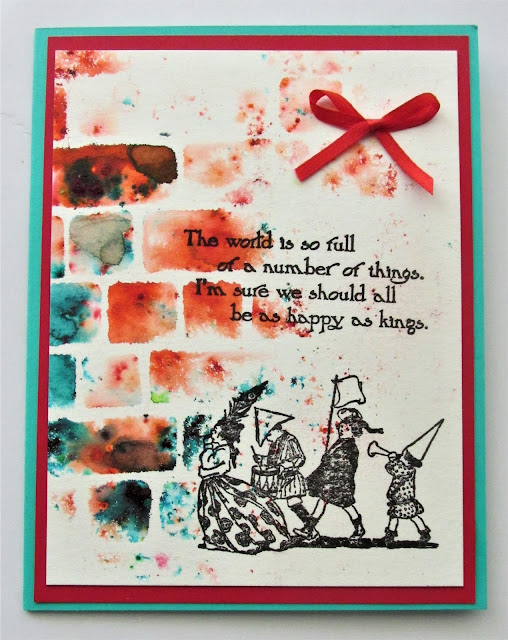
Good afternoon!  Why am I posting today you might ask?  I have made a card for the birthday celebration over at Try It On Tuesday and wanted to post it right away!  The theme is Let's Party!

I made this card with a background I demonstrated for you a couple of weeks ago. Color Burst Powders Technique.  Today for TIOT's 10th Birthday, I stamped on it with Memento Black Tuxedo
ink and stamped an image from Hampton Art's Graphic 45 Children's Hour.  These cute kids are marching to a party and are celebrating how happy we are or should be!  :)


I love both the image and the sentiment in this set.


Besides being for the TIOT Challenge it is for the following challenges at SplitcoastStamper.

Alphabet Challenge Round 11: letter K

Free 4 All Challenge:  Memories Captured

Fan Club Monthly Theme:  Central Theme: Memories and Milestones

USEIT2019:  This is the first time I have ever used these stamps.

Ways To Use It:  Buttons, Bows, and Beads, Oh My!

Thank you for letting me participate in TIOT for Let's Party!  Be sure and stop over there and see all the other submissions.

Thank you for looking and stopping by.


Monday, April 29, 2019

T Stands For Technique

"He has risen!"  Matt. 28:6

Since Elizabeth wanted to know how I did her birthday card, I thought I would show all of you the technique I used.  It is a Watercolor Stencil Technique that I saw demonstrated by Loll Thompson.  However, I did it in the wrong order when I did the first cards with it, but liked the results better.
Today, I am demonstrating for you, doing it correctly!

First thing is to cut down some watercolor paper and put a stencil over it.  The rest of my sample photos will be with a different stencil.  I just forgot to photograph the other at this stage.  Now, when I made Elizabeth's card, I sprayed water on the stencil, then removed it and sprinkled the powders.  You pretty much get the same result.


However, Loll Thompson said to put powder on while stencil is on and spray with water then quickly remove the stencil.  I think this way is a lot messier than the way I did it!


After you take the stencil off, it looks like this and you will have to heat dry with a heat gun and blot some, too. 


It looks like this after drying.


My stencil was so wet with paint, I decided to turn it over on another piece of watercolor paper and get the reverse!  I just sit it on there and pushed down and then carefully removed the stencil.


So here is the reverse.


Here are all the prints I ended up with. I didn't like the brick as well, but I will use it for a card.  After these are all dry, I will cut down for backgrounds for cards.


Here are the two cards I made last week with them the first backgrounds I made my way: by spraying with water while the stencil was on, then taking off and sprinkling the powders on.

Elizabeth's Birthday Card


Here are the supplies I used besides paper towels to blot and the heat gun to dry.  The Aspen Trees was TCW and the bricks were MFT.


I hope I explained well enough.  If you have any questions, let me know.  I will try to answer or direct you to the Loll Thompson video.  I will say the Color Bursts are messy.  The color spreads when you try to clean it!  Remember the Cat in the Hat and the pink spot.  Well, this is like that, it just keeps growing as you try to clean it!  Last week, I even made a lot of baby wipe backgrounds with all the access color! LOL


For our Tea party over at Altered Book Lover's T Stands For Tuesday, may I leave you with this:

A card I made from mostly Fun Stampers Journey supplies.  the Embossing Folder is SU!.

Sorry everyone for not getting around last week.  I have been really sick and finally went to the dr. last Friday.  I got some meds, and am finally starting to feel human again!  I t seems I had bronchitis. So thank you for all who stopped by last week and offered well wishes.  I really appreciated them.  Thank you for stopping by this week.  I will be around to see you.  Happy T Day!